Learning the environment through Deep Learning
In the previous post, we delved into the fundamental aspects of constructing a robot, focusing predominantly on its electronic and mechanical components. Basic programming for elementary motion was also covered. In this subsequent iteration, our objective is to infuse a touch of intelligence into the robot through the integration of machine learning.
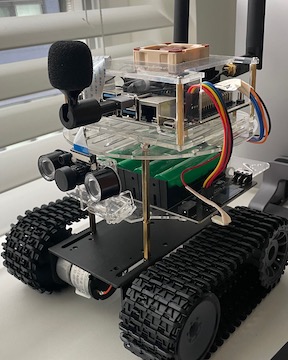
The inspiration to enhance the robot’s design came from a friend who recommended a modification involving a tank chassis. This adjustment addressed the issue of misaligned wheels that had previously resulted in sideways movement during forward motion. The tank track not only offered improved alignment but also exhibited superior adaptability to navigate carpets and other uneven surfaces in my house. Moreover, it facilitated seamless rotation or pivoting, allowing the robot to turn around itself with minimal lateral movement. The accompanying image illustrates the modified version of the robot. Despite the mechanical alterations, the underlying code utilized for driving it remains unchanged.
Additional Hardware
Camera Module
The camera employed in this setup is the IMX219, specifically an infrared camera with a 160-degree field of view (FOV). To enhance its functionality, two IR LEDs are strategically positioned on either side, as depicted in the accompanying image. While the picture quality from this camera may not be exceptional based on my experience, it performs adequately well for the requirements of our project.
Wireless
The Wi-Fi module utilized in this configuration is the Dual Mode AC8265 Wireless NIC Module. Given the necessity for installing Python modules and downloading prebuilt models, maintaining a stable Wi-Fi connection becomes an essential advantage in ensuring smooth operations.
Automating Movement
Objective
A previously identified issue with the robot’s earlier version, as discussed earlier, involved its uncontrollable sideways movement despite being intended to follow a straight path. In my scenario, this tendency led to the robot gradually veering onto my carpeted floor and getting stuck or venturing beneath my furniture.
To address this challenge, a touch of computer vision-based deep learning has been incorporated to automate the robot’s motion in the current iteration.
Designing & Implementing the solution
- Data Collection: The initial step involved outlining a designated track for the robot within the motion area, which, in my case, was the living room. To familiarize the robot with this track, an extensive set of pictures was captured using its camera, depicting various aspects of the environment during its movement. These images encompassed segments of the typical track, perspectives during sideways drifts, and scenarios where the robot encountered furniture.
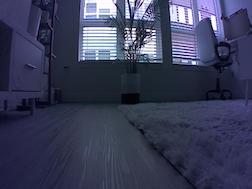
Areas where the robot is anticipated to move forward (straight path beside the carpet):
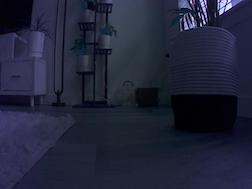
Some regions where the robot is expected to reverse its path (eg. About to get stuck near some furniture, or near my house plant):The idea was to enable the robot to move a short distance, capture an image, and then autonomously determine its next direction. To train the initial iteration of the decision-making process, I amassed a dataset consisting of 500 images from around my room.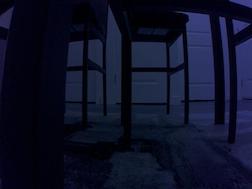
- The Classifier: For the preliminary decision-making version, I'm opting for simplicity with a concise multi-class classifier. This classifier comprises four classes (representing directions): forward, reverse, turn-left, and turn-right. To streamline the process, all collected images were organized into four distinct folders, each named after its corresponding class (direction).
-
Training: Following numerous experiments involving coding and fine-tuning classifiers, I turned to Transfer learning. Utilizing the PyTorch framework, I loaded AlexNet and adjusted the fully connected layer to accommodate the number of classes (4) relevant to this use case.
The training code is available here. Remarkably, the model achieves 99% accuracy in approximately 50 epochs. Initial experiments did not yield satisfactory accuracy, prompting a closer examination. To identify any specific class causing accuracy loss, I had the class-level error rates printed for each epoch. The most proficient model was saved during training and labeled as 'best_model_tank_v1.pth'. -
Coding the Next-Step Decision Maker: The code for testing the robot's motion, controlled by the neural net classifier, is available here. As mentioned earlier, the robot's movement is executed in discrete steps. At each step of the motion, the robot captures an image and decides an action for the next time step.
The captured image is passed as a numpy array parameter to this function, where it undergoes the same pre-processing applied during the training of the classifier. The engine module is responsible for loading the previously saved weights from our best model during training, setting it to eval mode for deployment. The classified output corresponds to an index mapping to one of the four directions.
Returning to the motion iteration, if the decision made is forward, the robot moves straight for 0.4 seconds, and so forth. This portion of the code is specifically tailored and lacks advanced intelligence, as it has been customized based on the time taken by the robot for 90-degree sideways turns. Further details on moving the robot in different directions can be found in the previous post. - Testing/ Deployment: A small portion of the robot motion guided by the classifier can be seen here: Clip 1: Robot Motion. Also, here is a short clip of the robot detecting objects in its path and choosing to move back to form a different path in the next timestep: Clip 2: Avoiding Collisions.